Tuesday, November 1, 2011

Out of the Kitchen

I've not been posting lately because my Hubby is back home for the winter, and he typically does the cooking!  (I know, right?!)  Yes, I'm lucky.  It's nice to come home to a hot meal and not have to worry about anything but cleaning up the copious dishes and pots and pans the man goes through.

I will say this, however: There are a LOT of dirty dishes out and about in our household lately.  I can have the sink completely empty, and by the next evening, it'll be standing slap full a whole foot above the sink itself!  Now how does it DO that?!?  We save the plastic kiddie cups most restaurants use for children's beverages, and my boys will use them at meal times.  But we go through half a dozen or so of these things a day, especially on weekends!  And they start to show up in some of the strangest places around the house...

We're still trying to keep our meals healthy.  He's actually being very nice about accommodating my request to NOT cook everything in bacon fat!  LOL  I do kid.  We've been eating pretty healthy for years now, always trying to include vegetables when we can, almost never deep frying our foods except on rare occasions, and now starting to use cooking methods that help cut down on the fat and unnecessary calories.  And the new foods we've been trying are actually quite good, things even he and my carb-loving boys seem to enjoy!  So life's pretty good right now.

Anyway, I'll try and take pictures and post recipes when I do cook on occasion, or if Hubby fixes something particularly worth bragging about.  But in the mean time, I'll just grab my fork and head for the table to see what's for dinner.

Laters...

Wednesday, October 5, 2011

Meatballs!

Meatballs.  You know, this is a very versatile food that spans cultures the world over.  I think back to my childhood days, and the first thing that pops into my mind is the Indian kofta curry (of which there are MANY types, but Mum's were always made with ground beef) that my mum used to make and served with rice.  Then there are Swedish meatballs (something I still haven't tried to make but will eventually get around to), not to mention albondigas (a Mexican meatball soup), and another one of my personal favorites, Chinese-style fish ball soup. (Check out this recipe here for a delicious Malaysian version I grew up eating.)  But I think the most iconic meatball dish has got to be the Italian meatballs in marinara served over spaghetti.

While following my new figure-friendly cooking habits, I came across this recipe that uses ground chicken in place of ground beef.  I couldn't find ground chicken at the store on the particular day I was shopping, so I went with ground turkey instead.  And since I have two young kiddos to cook for, I made the meatballs half the size of what the recipe originally called for.  Once you have the meat mixture mixed well, roll out the meatballs, and give them a quick browning on all sides (or as best as you can, since these are soft and tend to flatten as they cook, so you end up with little triangular pyramid-shaped meatballs...lol...)

Meanwhile, you'll have your marinara simmering away in a large pot--note the LARGE pot, as you'll eventually need to add your meatballs to the sauce, something which I neglected to take into consideration at the time and wound up having to switch halfway through.  Cook up some spaghetti, whole wheat, and serve with a sprinkle of parsley and grated parmesan cheese.  The kids wolfed it down pretty quick, so I guess this worked out well, and it also reheats beautifully.  It's a definite "keeper."

I also made some meatloaf this week using lean ground beef, mashed potatoes (3 parts potato to 1 part cauliflower), and steamed veggies on the side.  If all works out time-wise, I also have a recipe for Shrimp Creole that I'd like to try, served over a bed of brown rice.  I even splurged and bought some white wine to cook with!

Healthy eating needn't break the bank, but usually you do end up paying more for quality ingredients.  I've noticed this while making the switch from processed to more whole foods, and the sad truth is that healthier eating just doesn't make it onto those dollar menus.

I think the government and FDA needs to take this into consideration.  You want people to be healthier in an effort to lower healthcare costs down the road?  How about making healthy food options and ingredients more affordable to the masses?!  I know, I know, there are so many factors that go into the equation, but I can dream, can't I?

But anyway, back to the meatballs in marinara.  The recipe is simple, the method straightforward.  Here's what I did...


Turkey Meatballs in Spicy Marinara

- 1 pound ground turkey
- 1 cup egg substitute
- 1/2 cup rolled oats
- 1 slice whole wheat bread torn into small pieces, moistened in water, and squeezed out
- 1/4 cup chopped fresh parsley (can use flat-leaf Italian)
- 1/4 cup grated parmesan cheese
- freshly ground black pepper
- 2 (28oz) cans diced tomatoes OR 3 (14.5 oz) cans diced tomatoes PLUS 1 (14 oz) can tomato sauce, use "no salt added" varieties if available
- 1 tsp canola oil
- 1 Tbsp minced garlic
- 1 Tbsp chili powder (or to taste)
- red pepper flakes or cayenne pepper (optional)
- 1/2 tsp Italian seasoning
- a few pinches of cinnamon
- 1-1/2 Tbsp agave nectar or some other sweetener
- extra parsley for garnish

1.  Combine first 6 ingredients; mix well.  Separate into 12 large meatballs (or 24 small ones) and brown on all sides in a large, nonstick skillet sprayed with cooking spray over medium heat.  Cook in batches to avoid overcrowding the pan.

2.  While meatballs are browning, in a large pot, bring tomatoes to a boil, then reduce heat to medium-low.  Let simmer about 10 minutes.

3.  In a separate small pan, heat canola oil and cook garlic just long enough to become fragrant but without browning.  Add chili powder with enough water to make a paste.  Add red pepper or cayenne pepper if using.  Cook 1 minute, then transfer to tomatoes.  Add Italian seasoning, cinnamon, and agave nectar.  Mix well.

4.  Transfer browned meatballs to tomato mixture.  Allow meatballs to finish cooking in simmering marinara, approximately 10-12 minutes more.  Serve over spaghetti and garnish with parsley.


Have a great rest of the week!  :)


Monday, September 19, 2011

Guiltless Lasagna...You Heard Right!

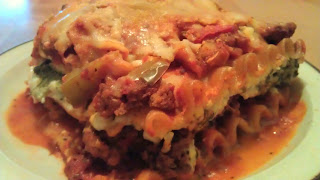
What can be more comforting than a wonderful, meaty, cheesy piece of lasagna?  I made this last week, a recipe straight out of the Food Lovers program.  The dish is designed to have as little impact as possible on your blood sugar (therefore avoiding a spike in insulin levels), so it's probably the most healthy version I've ever attempted in my kitchen.  (By the way, this approach to eating is an excellent practice for people who are dealing with diabetes or have unstable blood sugar.)  This is the picture of an actual slice, and although it's not the neatest cut, it still looks pretty darn good.  LOL!  My kids aren't big fans of bell peppers, yet I still cook with them.  However, since you do use a whole red pepper AND a whole green pepper in here, I think I'm going to have to puree them or something, just so I can sneak them into the sauce.  If they can't see them, they'll eat them.

That being said, they didn't seem to mind the generous helping of spinach mixed in with the cheese, so I guess it's not all a loss.  Ha!  Flavor-wise, I give it nothing but rave reviews.  This also happens to be one of the tastiest lasagnas I've made, and I have to say my lasagnas are pretty good either way.

But be warned: This makes a FULL 15x10 pan.  My humongous 5-quart Pyrex was slap full, as it does make 12 portions of lasagna.  But since I'm not going portion-crazy and actually paying attention to portion size, it means having leftovers...a LOT of leftovers.  I will definitely make this again, but it will have to be when my husband's home to eat the rest of it.  Meanwhile, I've tried freezing individual portions, so one of these days, I'll report back on how well they thaw and reheat.  Watch this space.

I've promised folks in my Facebook group of the same name (which you can get to right here) the recipe for this dish, and here it is.  Have at it, and enjoy every bite knowing that you're doing something good for yourself and your body.


Nabela's Version of the Food Lovers' Lasagna

16 whole wheat lasagna noodles
1 pound lean ground beef (can use turkey)
1/4 tsp ground cinnamon, optional
1 medium green bell pepper, chopped
1 medium red bell pepper, chopped
2 (24 oz) jars Prego Tomato and Basil sauce (I used Ragu Sugar Free Tomato and Basil)
4 cups low fat, small curd cottage cheese
8 oz frozen spinach, thawed and excess water squeezed out
1 large egg, beaten (can use egg substitute)
2 cups part-skim shredded mozzarella cheese
1/4 cup grated Parmesan cheese
salt and pepper

1.  In a large pot, prepare lasagna noodles according to package directions.  Lay cooked noodles in a single layer on cookie sheets covered with wax paper.
2.  Brown beef (or turkey) and drain.  If using, add cinnamon.
3.  Add bell peppers and cook over medium heat for 7-8 minutes until tender.  Season with salt and pepper to taste.
4.  Add pasta sauce.  Bring sauce to a boil, then reduce heat and let simmer 10 minutes.
5.  Meanwhile, in a medium bowl combine cottage cheese, spinach, egg, and 1/2 cup mozzarella cheese.  (I would also add a touch of salt.)
6.  Spray 15 x 10 glass dish with cooking spray.  Ladle a small amount of sauce into dish to lightly coat the bottom.  Lay 4 strips of lasagna noodles lengthwise along the bottom, and trim a 5th piece to fill the space on the end.  Add 1/2 the meat sauce over the noodles and spread evenly.
7.  Trim 6 lasagna noodles to fit across the width of the pan.  Lay these out, then add all of cottage cheese mixture and spread evenly.
8.  Lay 4 lasagna noodles lengthwise and trim the last piece to fit the end.  (You will have extra trimmed pieces left, which you can layer over the top.)  Add remaining meat sauce and spread evenly.  Top with remaining mozzarella and grated Parmesan.
9.  Cover tightly with foil.  Bake in a 375-degree oven for 40 minutes.  Remove foil and bake an additional 10-15 minutes until cheese is melted and bubbly.
10.  Allow to cool several minutes, then cut into 12 equal portions.


You can fill this out with a side salad (watch the dressing), or perhaps a cup of vegetable soup.  Or enjoy it on its own!  It's quite filling.

Until next time, happy cooking!  :)

Thursday, September 8, 2011

The Incredible Edible Pea Pod


I've done the shrimp fried rice a few times now, and I'd say I'm quite getting the hang of it.  This week I found a great deal on a bag of snow peas (I still call them "mange tout" from my days in England), and I was inspired.  I LOVE these things in stir fries!  Basically, snow peas (a.k.a. sugar snap peas) are your regular garden peas just in "baby" form.  In fact, the French term describes it quite accurately, mange (pronounced MONGE with a soft G) meaning "eat" and tout (pronounced TOO) meaning "all."  You do quite literally eat it all, pod and all!

For those of you wanting a bit more in depth discussion, please check out this link here.

So, grabbing a bag of salad shrimp--which were on sale, as opposed to the usual small/medium shrimp I buy--I went with the Minute brown rice (I was in a bit of a time crunch) and threw this together in literally minutes.

Shrimp Fried Rice with Snow Peas

Neither of my boys cared for the snow peas, which mortified me for about 2 seconds, at which point I happily scoffed them.  LOL!  As a backup, however, I did include the peas and carrots for a little extra veggies, since I was skipping the mung bean sprouts this time.  (I know, sinner that I am.)

As usual, my youngest boy ate up all the rice and shrimp, carefully picking around anything that resembled a vegetable.  What surprised me was how, when finished, he proceeded to shovel the peas and carrots into his mouth until there was nothing left!

SCORE ONE FOR MOMMY!!!  <punches the air and mentally yells, "YES!!!">

My oldest boy calmly ate through two helpings of the stuff.  I was chuffed.  That's the beauty of stir fries though, they're so versatile!  You can make them with rice, noodles, or skip the starches and go with meat and/or veggies!  The sauce can be as simple or complex as you like.  And the best part...it all comes together in a matter of minutes.  I'm thinking of doing something with noodles next time, perhaps some of the thin and delicate rice noodles I've seen in many Asian stores or in the ethnic food aisles at the local grocery stores.  The possibilities are endless!

As for the rest of this week, well, we're still trying to get back on track with the cooking.  Leftover grilled chicken from this Labor Day weekend has made an appearance (of course it always tastes better the second time, when there's much less of it), and this Friday will be our recipe exchange dinner, so I'm not sure exactly what we'll be eating.  I'll be bringing the sausage, apple, and cranberry stuffing that's been the highlight of our last few Thanksgiving dinners, so hopefully that will go down well!

More next week, fellow foodies!

Thursday, September 1, 2011

Going Greek (and Asian)!

Wow!  September already, huh?  It's getting to that time of year, my favorite time of year actually.  The colors, the cooler weather (big plus), and of course, the food!  This final quarter of the year has a couple of biggies, namely Thanksgiving and Christmas, both of which have their own special menus and flavors.  Getting exciting!

Ok, so this past week was another crazy one.  My oldest boy is back in soccer this Fall, and he's also joined up with the local Tiger cub scout pack.  That means we're now going to have to eat out on Tuesday nights until Hubby is in his off-season from work, but that just means I'm going to have to find healthier food options besides the McDonald's drive through, which we resorted to this week on account my bus was late and I missed my connecting bus home.  Anyway, I made it in time to get the boys and get to the pack meeting, I just didn't make it in time to take them somewhere decent to eat.

So the first dish I prepared was a Greek spin on a simple pasta dish.  I took a recipe from a newspaper clipping and changed it around a bit...actually a lot...to suit our tastes.  The dish starts with browned ground beef and onions, drained, and then to that I added chopped zucchini, yellow squash, and tomatoes, all from our garden.  (The garden's on it's last leg now, the only viable part of it remaining are the green beans.)  Added a can of low-sodium beef broth and 1-1/2 cups of orzo, bring to a boil, then simmer for about 8 minutes until the orzo was tender.  Added in some frozen cut leaf spinach and about 1/4 cup crumbled feta cheese, cooked for another 2-3 minutes, and done.  Sprinkle about another 1/4 cup of feta on top and serve.  Since I used low-sodium beef broth, I did end up having to add a little bit of salt to get it where I wanted it.  At least you have that kind of control, which is what I love about low-sodium products.

My reheated version was good, just needed to revive it a little with some water because the pasta soaked all the beef broth up.  Also, since I used frozen spinach instead of fresh, the vibrant green color I've come to love is lacking, not to mention the lighting wasn't very good when taking this snapshot.  Oh well, at least the flavors were there.  The boys cleaned their plates, and the youngest wanted seconds, so I guess we're keeping this recipe.  LOL!

Taken from Publix.com
Next up is a recipe I clipped from a Publix sale paper, Brazilian chicken curry.  This picture is from their recipe, but honest to goodness, mine looked almost identical!  I just didn't have my camera handy.  Really!  :)  I did make changes though, since I've started using garlic ginger paste in my cooking in place of actual minced garlic and ginger.  I substituted 4 tsp of the paste for the garlic and ginger called for in the recipe, and instead of making the packaged brown rice, I made my own coconut rice!  I got the idea from a traditional Malaysian dish (my mother is from Malaysia after all) called nasi lemak, which you can read about here.  The coconut milk I used in the curry comes in a much larger can than I needed, which was only 1/2 a cup, so I used the rest of it to make my rice.  I use the 1st-knuckle method, which I will describe, since I'm of the school of thought that prefers rice cooked in a pot as opposed to a rice cooker.  (We received one as a wedding gift almost a decade ago and have yet to use it!  Who knows...maybe I'll get crazy one of these days and try it out.)  I like the addition of sugar because if serving a spicy dish, the slight hint of sweetness helps to balance the flavors.  That being said, I think my final result was more Asian than Brazilian, and if I could get my hands on some lemongrass, that would have given it that much more of an oriental flavor.  I'd use that in place of the cilantro.  Anyway, here's the rice recipe below:


Simple Coconut Rice (serves 4)

- 1-1/2 cups white rice (I use basmati, but jasmine rice will give a good result and is more traditional)
- approx. 1-1/4 cup coconut milk
- 1 tbsp sugar, more or less as desired
- pinch of salt

1.  In a medium saucepan, wash and drain rice 6-7 times with water until it runs clear; drain.
2.  Add coconut milk and enough water so that the level reaches your 1st knuckle when touching the top of the rice with the tip of your finger.  Add salt and sugar, if using.
3.  Cover tightly and bring rice mixture to a slow boil over medium heat, stirring every few minutes to avoid sticking and burning.
4.  Once bubbling, turn heat down to LOW; set lid askew to allow steam to vent, and cook an additional 6-8 minutes until liquid has evaporated.  Test rice for doneness.
5.  Remove from heat and cover tightly again.  Allow to sit 5 minutes.  Fluff with a fork and serve.

*Optional: Dress up the rice with a little toasted unsweetened coconut sprinkled on top prior to serving.


I will say that while reheating leftover rice is ok, you'll need to add some water to recreate the steam, otherwise it will be dry.  You could also try using it in a spicy stir-fry dish, which might make a nice and unexpected change!  Experiment and have fun with it.

Enjoy, and see you back here next week (I hope)!

Friday, August 12, 2011

Shrimp Fried Rice Revisited

Sometimes, first attempts don't always turn out right.  So this week, I gave the shrimp fried rice recipe another shot.  I increased the eggs from 2 to 3, added some ground ginger and garlic chili sauce to the beaten eggs, and added some frozen peas and carrots along with the shrimp.  I think I also added a little extra soy sauce because (once again) I used a whole bag of bean sprouts instead of the suggested 1 cup.  I also omitted the baby corn and sliced mushrooms because I forgot to buy them and didn't have any on hand.  I also didn't think I had any green onions (hence the peas), but it turns out I did, so maybe I'll use them next time.  Oops!

I have to say I was more pleased with the flavor this time.  The kids ate it up, too, but as usual, I like to doctor mine up with a little extra something.  For that, I like to add a little sweet chili sauce.

This sauce is pretty hot, so start of slow and add only as much as you need.  It gives this wonderful sweet heat that makes stir fry dishes POP!  I suppose it would be pretty good on just about anything, but that's just me.  :)  Hmmm...I wonder how well it would go with a bowl of vanilla ice cream....?  Just a thought.

We had a bit of a hectic week this week, so a quick throw-together meal we had one night was a popcorn chicken salad.  It really is as simple as it sounds: Bagged salad mix, cottage cheese, shredded cheddar cheese, chopped tomatoes, popcorn chicken right from the grocery store deli, Ken's honey mustard dressing (I've found I can get the little guy to eat salad so long as it's drenched in honey mustard dressing), some garlic herb croutons, et voilĂ !

A pound of ground beef can go a long way, when you're cooking for 1 adult and 2 little kiddos.  I used it to make a taco salad (served over crushed up tortilla chips with all the fixings) and a very simple Cowboy Beans recipe.  Both were received very well, I'm please to say.  In fact, while I was prepping the taco beef for the salad, I had another pot on the stove with the Cowboy Beans bubbling away.

Hopefully things will be a little less crazy this weekend, so that I can get back to some more involved recipes.  In the mean time, here's my version of simple Cowboy Beans...


Cowboy Beans (serves 2)
Ingredients:
-1/2 lb lean ground beef
-1/2 medium onion
- large can of your favorite baked beans (at least 20 oz)
- about 1/4 cup barbecue sauce
- about 1/4 lb bagged frozen spinach (no need to thaw)
- fresh ground black pepper

Brown beef with onion in a 3-quart pot.  Drain excess fat.  Add remaining ingredients and bring to a boil.  Immediately reduce heat and simmer until heated through and spinach has thawed (about 10 minutes).  Enjoy!

Friday, August 5, 2011

Whole Wheat Baked Ziti

Last week, I revisited the baked ziti dish, only this time I put my own spin on it.  I'd been doing some reading into low-glycemic index foods, and it turns out that whole wheat pasta is low(er) compared to regular pasta.

Those of you with a sharp eye will also notice I didn't use ziti pasta.  I couldn't find whole wheat ziti noodles at my local store, so penne was the next best thing.

The whole process is very straightforward, and pasta dishes with lots of cheese are a guaranteed hit with my boys, so this is going to become a regular in my recipe repertoire.  Here are the ingredients and steps...


Whole Wheat Baked Ziti/Penne (serves 8-10)

Ingredients:
16 oz whole wheat ziti/penne pasta
16-24 oz ricotta cheese
16 oz shredded mozzarella cheese, divided
1 egg, beaten
2 cloves garlic, minced
1 tbsp dried Italian seasoning
2 cups torn baby spinach leaves
salt and pepper to taste
24-32 oz jar garden style pasta sauce (or your favorite sauce), divided
about 1/4 cup grated Parmesan cheese

Method:
1.  Cook pasta according to package directions.  Remove and drain while still slightly undercooked; set aside.
2.  Preheat oven to 375 degrees F.
3.  In a large bowl, combine remaining ingredients along with 2/3 of the mozzarella cheese and 2/3 of the pasta sauce.  Add pasta and mix to coat evenly.
4.  Spray a 9x13 baking dish with cooking spray and spoon pasta mixture into the dish.  Top with remaining sauce and mozzarella cheese.  Sprinkle on Parmesan cheese.
5.  Cover tightly with foil and bake for 30 mins or until heated through.  Allow to set 10-15 minutes prior to serving.


Since you have the spinach in the dish and the veggies from the sauce, this can be a good one-dish meal.  If you want to add more veggies to the sauce, cook them down a little first.  The leftovers are great!  Enjoy!  :)